Showing posts with label Elizabeth Engel. Show all posts

16 December 2020

Food Lab 47: Indian Breads


Your Food Labbers enjoyed a fantastic first pod/bubble meal together on Thanksgiving (cream of chestnut soup, Brussels sprouts salad with warm bacon hazelnut dressing, turkey with wild rice stuffing and gravy, Chef Spouse's decadent mashed potatoes, cranberry chutney, steamed green beans, sour cream dinner rolls, FOUR kinds of pie), and then gathered this past weekend for OUR FIRST FOOD LAB SINCE 2019.

Chef Spouse and I have been enjoying a fair amount of Indian cuisine during the pandemic, both due to cooking our way through the several Madhur Jaffrey cookbooks we have and due to the many excellent Indian carry out places walking distance from our house (one of which makes vindaloo so I hot I can't eat it all in one go - and that's saying something - and the other offering so many delicious vegetarian options, ordering without ordering WAY TOO MUCH is nearly impossible). And when we get take away, we always get bread - naan, roti, stuffed paratha - but when we cook at home? Not so much.

Well, that just cannot stand any longer.

We decided to tackle the three classics: roti, paratha, and naan. 

Roti and paratha are both unleavened breads that start with the same base - flour, water, a little salt (very similar to tortillas). The difference comes from the cooking method.

Naan is a leavened bread that generally also includes some animal fat/protein.

Seeing as the naan was going to have to rise, we started there. I had found various recipes that included egg, milk, or yogurt. However, Madhur Jaffrey's naan recipe included ALL THREE. Winner. 


Kneading the naan

The first challenge I ran into is that the dough was pretty dry. Jaffrey says to knead for ~10 minutes until smooth & satiny. I added about 1/4 c. additional milk as I went, but my dough never got "smooth & satiny" and by ten minutes in, it was developing a pretty firm gluten structure, so I figured I better stop and set it to rise and see what happened.

In the meantime, I moved onto mixing up my roti/paratha dough. Couldn't be more simple: two parts flour to one part water. Jaffrey did NOT have you include any salt, which we all felt might be a mistake (we were correct). 

Ah, but WHAT KIND of flour? 

Traditionally, folks use atta flour. We did not have atta flour, but the thing that makes it unique is that it has a high gluten content. King Arthur to the rescue! We decided to lab regular King Arthur whole wheat against King Arthur whole wheat pastry flour. Pasty flour, of course, is *pastry* flour because it has less gluten, so it stays soft and flaky rather than forming a firm structure. Yes, that's sort of counter to what you're ostensibly looking for in trying to make an unleavened bread, but we figured it would be an interesting test.

Anyway, you mix it up, knead it a bit, and then then it sit, covered with a damp towel, for ~30 minutes.


Roti/paratha dough in process

While that was resting, it was time to get ready to cook the naan. It's cooked a lot like pizza - set your rack about 6 inches from your broiler, pop your stones onto it, and then heat them as hot as your oven will go for a good 45+ minutes before baking.

Meanwhile, even though it never got smooth & satiny, the naan had doubled in size, so it was time to portion it, roll it out, and bake it. Three minutes on your HOT-HOT-HOT stones in your HOT-HOT-HOT oven so it puffs up, then turn on the broiler for ~30 seconds to brown it on top.


Patting out the naan dough


Portioning the naan dough


Rolling out the naan dough


Into the oven


Out of the oven

Easy-peasy, and it was DELICIOUS. It also held up the best the next day.

So why didn't the dough ever get "smooth & satiny"? I have a theory: Jaffrey calls for yogurt. I used the yogurt I normally have around - plain, whole milk Greek yogurt. Did you spot the problem? Greek yogurt is just regular yogurt....that's been strained again TO REMOVE EXTRA LIQUID. That straining that makes it so delightfully thick and creamy? Yeah, I think I maybe needed some of that to give the dough the right consistency. Next time, I'll start with more like 1 c. of milk to compensate, because once I was at the kneading stage, I was anxious about trying to add too much milk because I was afraid it wouldn't incorporate properly.

Onto roti and paratha! 

As I mentioned, the base is the same - the difference comes from how you cook it. 

Roti is just portioned out, rolled out, cooked on a hot comal or cast iron skillet, and then finished directly on the flame (gas stove or grill) to make it puff up. 


Roti puff from the whole wheat pastry flour


Roti puff from the plain whole wheat flour - now THAT's a puff!

Everyone else preferred the flavor of the pastry flour, but I like the regular whole wheat best - it was deliciously nutty, and you can't argue with that puff. Sadly, neither really held up the next day - the leftovers got fairly tough. Then again, it mixes up so fast and you can store the mixed up dough in the fridge (no worries about it over-rising because no leavening), so just cook what you're planning to eat right then. 

Paratha, on the other hand, is laminated first. Yes, like croissants. Only for paratha, you use ghee rather than cold (or even frozen) sheets of butter.

We found two methods of laminating. Jaffrey's was quite simple - roll out a disk, laminate with ghee, fold in half, laminate again, fold in half again (to give you a quarter), roll *lightly* one final time.


First lamination


Folding the dough


Second lamination


Folding the dough again and dusting with flour to roll out


Rolling out the dough 

Jaffrey's paratha then gets cooked immediately, in a cast iron skillet that's been brushed with ghee.


Cooking the paratha

Of course, while you're doing all that laminating is when you can slip in herbs or spices - the Indian carry out near us with all the amazing veg options does a masala spice paratha that is to die. We didn't mess around with flavors, but I plan to this coming weekend, when Chef Spouse and I will be making paratha again.

Serious Eats offered a more complex laminating method. You start with a much larger disk (basically two portions of your dough rather than just the one), roll it out thin again and laminate, but then roll it up like a carpet, stretch it, and roll the ends in like a palmier cookie. 


Rolling the laminated paratha up, carpet-style


Stretching the paratha


Aw - isn't that cute?

Then you rest ~45 minutes, roll out again, and cook, first dry frying on your comal and then finishing with a quick fry in ghee in your cast iron. 

Now remember, we had TWO versions of the dough: one with regular whole wheat flour and one with pastry flour.

I suspected we might be in trouble with the pastry flour when I couldn't stretch it and had to do a single coil as a result, and I was right. Pastry flour lacks the gluten structure to be able to sit at room temperature all buttered up and still be able to work.


The rolled out regular flour paratha cooking 
(and yes, it's OK to giggle - it 100% looks like a butt)


Pastry flour = Food Lab FAIL 
YAY!

Once we had all that bread, we needed something to eat it with, so Mad Kitchen Scientist and The Executive Committee whipped up some butter tofu and palak paneer for us, while Chef Spouse kept us occupied throughout the afternoon with various tamarind-based cocktails: a tequila version, a rum version, and a tiki-style drink that used the extra coconut milk from the butter tofu. No coconut milk left behind! 

They were all quite tasty, although Mad Kitchen Scientist observed, accurately, that they would be better served in opaque glasses, since the color was a little...odd. So we went with G&Ts for the meal. 


Your Food Labbers enjoying a yummy Indian feast

In conclusion, there is no reason not to make your own bread when you're making your own paneer or pindi or makhani. Naan requires a little thinking ahead - that rise takes about 60-90 minutes, so the whole thing start to finish is about 2-2.5 hours - but with roti or paratha, you could start the dough when you start work on the rest of the meal and have hot bread ready to go just as your main dish is finishing up. Chef Spouse and I will, in fact, be testing that theory this weekend.

Or, even shorter, homemade Indian meals will, henceforth, feature delicious Indian bread, too.


04 November 2020

Food Labbing in a Time of Coronavirus

Was April 2019 really the last time we had a food lab? Apparently it was, because the blog doesn't lie. Well, Mad Kitchen Scientist and The Executive Committee had a very busy summer, Chef Spouse and I did a ton of travel last fall (sigh.....), and then, of course, coronavirus hit. 

This has been an odd year for food lovers.

Weirdly, there have been some positive outcomes for those who care deeply about the quality and provenance of food. 

More people are cooking at home. More people are making things from scratch (hello, sourdough starter craze). More people planted vegetable gardens. More people signed up for CSAs (we resumed a CSA share, and I am SO PLEASED to report that I was able to find a local farm owned by a Black woman and operated by a team of women). Commercial suppliers enabled consumer accounts (well, they ALWAYS allowed anyone who wanted one to create an account - they just dramatically reduced the minimum order requirements, and more about that in a minute). 

It's also been a very hard time for food lovers. 

There have been shortages, both due to supply chain issues and due to panic buying. A woman in my larger circle, a long-time, serious baker, got savaged on social media for complaining that dilettante bakers were sucking up the entire flour supply. OK, sure, "flour privilege," but I also understood her frustration when MONTHS went by without being able to find flour of ANY type ANY where, when we all know significant amounts of it were sitting unused in the cabinets of people who moved on to learning French the following week and crocheting the week after and Peloton the week after that. 

Beloved restaurants and bars have struggled mightily. More casual places that always did significant carry out/delivery business mostly pivoted reasonably well and quickly, but the high-end places foodies dream of and plan for eating at had to radically and creatively re-tool their business models. And as cold weather closes in and the pandemic, which in the vast majority of the US was never successfully contained, ramps back up again, many of those beloved places will close, perhaps forever. That will throw a lot of people out of work and result in the hollowing out of a lot of business districts. 

Food related travel has ceased. And this was going to be a big year of that for your faithful Food Labbers. Chef Spouse and I were headed to Northern California once again in April, for a semi-regular conference speaking engagement I have, and this time we were were extending for a few days and heading to Napa because Chef Spouse had finally figured out the trick to landing a reservation at The French Laundry. He and I were also headed to Maui and the Big Island for a milestone birthday, with stays at a high-end eco resort, and in cottages on a coffee farm and a pineapple farm, with lots of diving (for him), snorkeling, kayaking, hiking, and, of course, eating planned. 

Most notably, 2020 marks ten years of Food Lab, and the core team - Chef Spouse and I, Mad Kitchen Scientist, and The Executive Committee - were headed to France for two weeks, with a week dining and sight-seeing our way through Paris (which I believe was to be a first for MKS and TEC), then a train hop to Avignon to pick up a rental car and another week at a gorgeous villa in Provence, repeating our Piedmont, Italy trip from a few years ago - farmer's markets, bistro lunches, hiking, and LOTS of cooking and wine drinking in the evenings. 

And the biggest hardship of all: one of the great joys of cooking seriously is sharing what you've created with people you love, and that's been right out for months. 

When DC passed into Phase 1 reopening in June, Chef Spouse and I were able to resume seeing friends in person - one household at a time and only one per week (to simplify contract tracing in case anyone did contract COVID-19), outdoors and physically distanced, and with everyone BYO everything. After three months of only interacting with other people via Zoom, it was a relief and major mental health boost.

During the past months, we've worked hard to incorporate some special food-related things, like ordering the most elaborate carry out dinner I've ever had for Chef Spouse's milestone birthday, figuring out how to get oysters direct from a local commercial oyster company, and setting up a consumer account with one of DC's top food purveyors.  At the time, there was literally no other way to find flour and there hadn't been for months. Thankfully, they allowed a minimum order of $250 (rather than the more typical $5,000). On the other hand, you're still mostly buying commercial quantities, so we split our 50 pound bag of King Arthur Sir Galahad with MKS and TEC (of course). We've continued to order from them for access to ingredients generally not available at the local Teeter (40 lb of pitted, frozen sour cherries? Why yes I will, thank you!) and to very high quality meats - and after butchering two entire lambs, breaking down an entire tenderloin of beef is really not a big deal.

But no Food Labbing, no parties, no dining out, no Supper Club (the  brain child of another friend of ours). Sadness. 

Well, that is about to change.

Health experts are recommending that people create small "pods" (or, as Chef Spouse prefers, "bubbles") to help us all safely get through the coming dark, cold months, when it will not be feasible to be together outdoors - at least not for very long - and when being locked in for months with just our own households just might make us all go crazy.  

Last weekend, as we were enjoying a lovely fall afternoon in Mad Kitchen Scientist and The Executive Committee's backyard and toasting "Next year in Paris!", we proposed creating a pod with them and, after consideration, they accepted. 

Our first indoor, no masks, shared meal since, I think, our Super Bowl party, will be Thanksgiving - we all liked the symbolism of that, and it will be more than two weeks past MKS and TEC's in person votes on Election Day (Chef Spouse and I voted early by mail) - after which....WE'LL BE RESUMING FOOD LAB!

So watch this space.....

24 April 2019

Food Lab 46: Onions (plus a guest star)

In spring, a young man's fancy may turn to thoughts of love, but your Food Labbers got thinking about onions. 

Alliums, and onions in particular, are one of the most common ingredients in savory foods of all kinds. Both Mad Kitchen Scientist and Chef Spouse have cutting boards dedicated just to alliums (because the last thing you want to do is cut up strawberries on a board that retains essence of garlic no matter how many times you wash it). Even if you're not sure what you're making for dinner, starting by mincing some garlic, dicing a shallot, or chopping up an onion is rarely going to be a waste of your time.

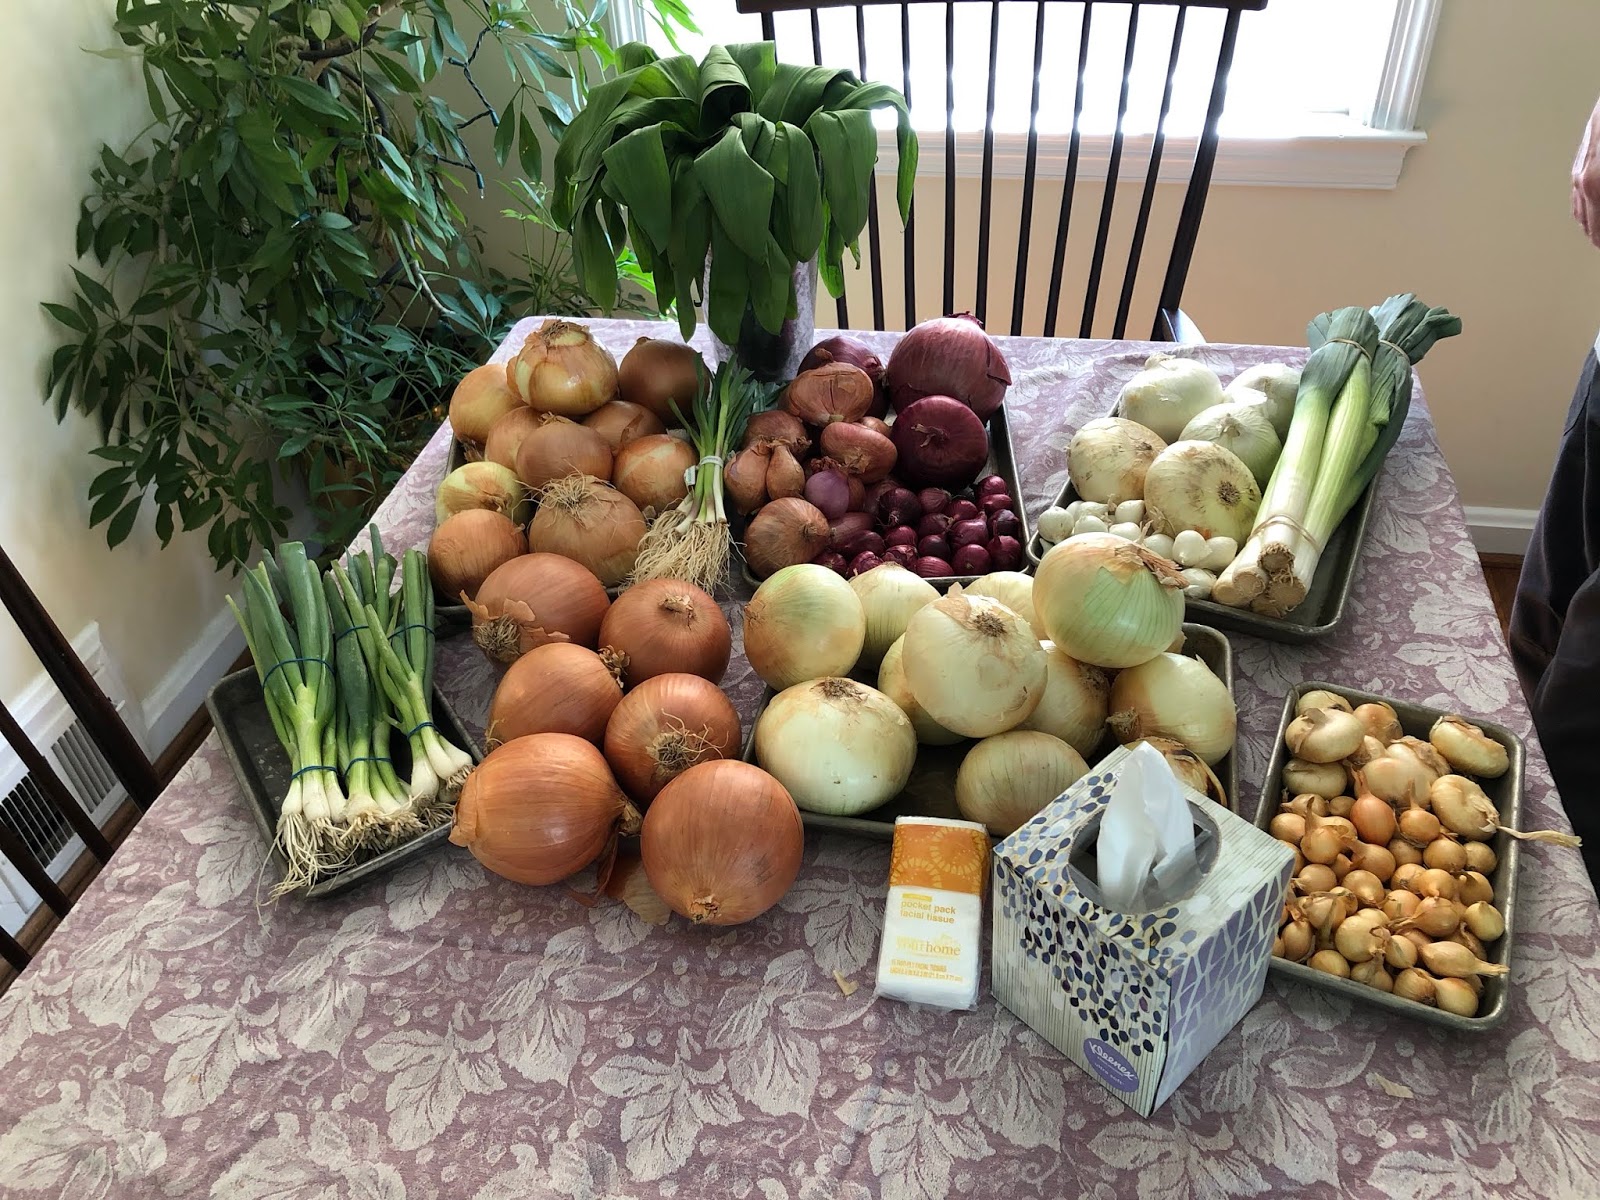
The thing is, we rarely pay much attention to our alliums. And there are so many varieties! Chives, garlic, scallions, spring onions, shallots, leeks, pearl onions, cipollini onions, white/yellow/red onions, sweet onions, Spanish onions, Vidalia onions, and of course, that elusive, delicious signifier of the season (and our special guest on Sunday) - ramps. 

Check out the tissues - we came prepared.
Sure, there are some rough associations: scallions as a finishing element, raw - shallots for French techniques and pan sauces - garlic that features prominently in Italian and Chinese cookery. But most of us just grab a string bag of onions and a bulb of garlic in our weekly run to the grocery store and figure we're good to go for another week's worth of dinners.

So we started with testing taste: Do they taste different? Yes, that meant tasting them all raw.

That's a LOT of raw onions, son. 
Short answer: they definitely all taste different, and the Food Lab crew highly recommends you do your own taste-off, preferably with a group that's also tasting with you, so you're not the only one with dragon breath at the end.

A few tasting notes:

Ramp tops are amazing - mildly peppery like really young arugula, but more more tender, and with a freshness that screams "SPRING!" If you get your hands on ramps in the spring, the temptation is to toss them with good olive oil, salt, and pepper and lightly grill them, and I won't judge you if you do. But you might want to consider - just consider - chopping the tops into a salad and then pickling the bulbs. 

Scallions really should never be cooked.

Cipollini onions are supposed to be sweeter than regular onions. That's a lie - at least with the ones we had. The zing on the palate was wasabi-level WHOA. I believe The Executive Committee may actually have been crying for a moment. 

If you're going for raw applications, you REALLY want to look for Vidalia or sweet onions. If you can't find them, red onions will work, but the Vidalia and sweet were definitely more mild and sweet, delightfully crunchy, and almost a bit creamy.

There wasn't as much difference in taste between pearl white, yellow, and red and regular sized white, yellow, and red as I would've imagined.

We then caramelized all the main varieties separately to see if they maintained their taste differences. 

Caramelization is about slowly cooking off all the water in the onions until they're a sweet and savory brown mass of umami goodness while also avoiding generating a Maillard Reaction. So low and slow, use cast iron, and salt early (remember, you're trying to cook all the water off). Also, set aside 45 minutes - one hour. No rushing! 

You cannot IMAGINE how good the kitchen smelled
One of the surprising differences was how much water the varieties contained. We started with precisely 565 g of each type, cooked in 2 TBSP butter, and identical amounts of salt. Most varieties, when the water was cooked off, ended up around 150 g. Not the Vidalia and the red onions though - they both ended up more like 250 g. Less water in the onion --> higher yield after caramelization. 

The sweet and Vidalia onions retained their distinctive creaminess and were more mild and subtle in flavor overall after caramelization. The rest of the varieties tasted pretty similar, other than the red onions, which were both strong and sweet and retained a little more structural integrity than the other varieties - see above, RE: less water. 

So once we had an absurdity of caramelized onions, then what? 

Caramelized onions freeze really well, in your handy-dandy ice cube trays, and we did plenty of that, for later use in any and all egg applications and grilled cheese and pan sauces and finishing soups. But we needed to make something we could eat - Food Labbers cannot live by raw onions alone (for which everyone else who knows or encounters us is deeply grateful).

We opted for galettes, which are basically pizzas that you make on pastry dough, or very rustic tarts. One variety was caramelized onions, Gruyere, green garlic and ramp leaves. The other was fig spread, caramelized onions, leeks, and blue cheese.


Of course, we grilled some ramps, and The Executive Committee made a lovely spring salad of radishes, snow peas, ramp tops, and ricotta salata (she is, after all, the one who makes sure we eat our veggies).

All this is pretty standard order. You know Mad Kitchen Scientist and I couldn't leave it at that. 

What's missing? 

Dessert. 

Oh yes we did make caramelized onion ice cream - vanilla custard base, the Vidalias, and toasted pecans. It was un-fucking-believable. So very, very good. This should definitely become a food trend, and if it does, make sure you point out that we discovered it first. 

Onion ice cream. It's a thing (or should be).
What did we drink? Gin, of course, first blind-tasting Bombay Sapphire, Hendricks, The Botanist, and the FEW barrel aged gins against each other in gibsons with home-pickled pearl onions (my favorite, and still the reigning champ, is Hendricks), then Chef Spouse used some saffron gin he'd picked up for me on a whim that has turned out to be VERY difficult to mix in a light cocktail featuring Cointreau, blanco vermouth, and orange bitters.

Our gin game is strong.
We did one other test, caramelizing onions in the Dutch oven on the Green Egg. As of 8 pm, when Chef Spouse and I had to get home to feed all our beasties, they were nowhere near done. I assume they finished in time for Mad Kitchen Scientist to go to work Monday, but I haven't confirmed yet. For all I know, he's still sitting there by the Green Egg watching the onions cook down and contemplating the universe. At least the weather's been delightful the past three days. 


25 February 2019

Food Lab 45: Almond-Flour Cookies

I grew up outside of Philadelphia, in southeastern Pennsylvania. As such, I had a lot of Italian-American friends growing up. When I was in elementary school, one of my close friends came from a large Italian family that owned a local bakery. One of the first times I went over to her house, her mom made spaghetti with red gravy for dinner. When I was served, I proceeded to cut up my spaghetti into bite-sized lengths. My friend's dad took one look at my mutilated pasta, picked up my plate, scraped the sad little chunks into the trash, refilled my plate, and taught me how to eat my pasta properly, deftly twirling the long strands around the tines of my fork. Thus began my life-long love affair with Italian cuisine.

My neighborhood in DC has undergone significant transitions over the years, one of which was the loss of an outpost of Baltimore's famous Vaccaro's. When that shop shut down, I lost my local connect for cannoli, coconut macaroons, and, most distressing, amaretti.

For those who've never had them, amaretti are the MOST delicious cookie in the world. Crisp on the outside, soft in the middle, with a delicate but pronounced almond flavor and just the right level of sweetness, they cannot be beat.

I've been up in Baltimore twice in the past six months, once for business, once for fun, BOTH times in walking distance of Vaccaro's. So both times, I brought home two dozen amaretti. As I was savoring the last one, I realized: these cannot be that difficult to make. Looking up recipes confirmed it. Clearly, Food Lab: Amaretti was too small a topic.

Ah, but there is another famous cookie made with almond flour and egg whites: French macarons. Conveniently, my bestie is downsizing and recently gave me an all-macaron cookbook she'd picked up on a whim a few years ago. Now we have a worthy Food Lab topic!

The macaron concept is simple (what follows is adapted from Entertaining With Beth).

You will need the following special equipment: a highly accurate digital scale, a fine-mesh sieve, an electric mixer, a pastry bag with a plain round tip, rimless cookie sheet(s) and silpat(s)

Sift 120g very finely ground almond flour + 200g powdered sugar through a fine sieve into a bowl and set aside.


Whip the whites from three ROOM TEMPERATURE eggs until they start to foam, then add a pinch of salt, 50g of granulated sugar (that you can omit if you're finding your macarons too sweet), and 1/4 tsp cream of tartar (do NOT omit this - it's the secret ingredient to REALLY FLUFFY egg whites), and continue to whip them HARD for 8-10 minutes. You basically want the egg whites to end up the consistency of whipped cream, so you're going to need to use an electric mixer or a LOT of elbow grease - I recommend the mixer.


Combine the whipped egg white mixture with the dry ingredients mixture (I found it easier to pour the dry into the whipped eggs), stirring ~70 times with a rubber spatula, then pipe onto silpat-lined rimless cookie sheets. As Beth explains well in the link above, it's important to neither under- nor over-mix your batter. Flaws - cracked cookies, no "feet," cookies that spread out too far - are usually a result of mixing errors.

You can really pipe any size you choose. We went with piping roughly 1 inch diameter rounds, which gave us approximately 60 cookies per batch (so 30 once paired). I would think making them much smaller would be difficult, but you can certainly make them larger if you like.


Bang them on the counter hard a few times to settle any air bubbles, let them rest and set for 30-60 minutes (at which point you can pat down any little peaks you may have created in piping them out), then bake for 20 minutes at 300 degrees. The resting time is also important for the formation of their distinctive "feet." Don't short it.

Once the cookies are cool, take them off the silpat and make little sandwiches by piping on buttercream filling.

We tested the silpat versus a single-tasker macaron mat versus parchment paper. Go with the silpat. The single-tasker is now in the garbage where it belongs, and even the parchment paper sometimes didn't want to release the little buggers.

Basic buttercream: beat 1/2 stick (1/4 c.) room temperature unsalted butter, then slowly add in ~3/4 c. powdered sugar

Now, that all is going to give you a macaron, but it will be kind of dull. How do they make all those pretty colors and flavors you see at bakeries?

Well, the cookie colors are a result of adding food coloring to the eggs while you're whipping them (except in the case of chocolate cookies, which are the result of adding 10g of cocoa powder to the dry mix).

The cookie flavors (again, aside from chocolate) are a result of adding 1/2 tsp of the extract of your choice to the eggs while you're whipping them.

We chose to make vanilla (with extract), chocolate (with 10g cocoa powder), lemon (with extract and food coloring), rose (with rose flower water and food coloring), and coconut (with extract) cookies. We decorated the coconut cookies with a little sprinkle of flake coconut on top before baking (also so we could visually differentiate them from the vanilla cookies).

Chocolate, on parchment paper

Rose (color from red food coloring), on my beloved silpat

Vanilla, on the damn single-tasker, to which several of the cookies stuck
All the cookie batter came out quite consistent OTHER than the lemon. It's possible we whipped the eggs a little less, or it may have been that lemon extract includes some lemon oil. As you can see from the pictures above of the chocolate, rose, and vanilla cookies just out of the oven, the other batters were quite firm and stayed exactly where and as piped, including lumps, bumps, and ridges. The lemon, as you can see in the picture below, was definitely smoother, but it was much harder to pipe (as The Executive Committee discovered to her dismay, having drawn the "pipe" straw for that batch).


You can, of course, also flavor and color your buttercream. In fact, if you flavor your buttercream, you *should* color it so you can identify what's what.

We made the following icings:

  • Hazelnut (adding about 1/8 c. very finely ground nuts)
  • Macadamia (same)
  • Orange (adding about a tsp. of orange extract and food coloring)
  • Cherry (adding 1 oz. Ginja Licor - a Portuguese sour cherry brandy - and food coloring)
  • Coffee whiskey (adding 1 oz. bourbon and espresso powder to taste)
  • Passionfruit (adding about 2 oz. passionfruit puree and food coloring)
  • Rose (adding about 1 oz. rose flower water and food coloring)
  • Chocolate (adding about 2 tsp. cocoa powder)

(We went a little nuts)

We were able to incorporate the nut pastes and cocoa powder without having to put the buttercream back in the mixer. Any time you're trying to incorporate any sort of liquid, don't try to do it by hand - it's a pain in the ass and takes forever. Also, if you add liquid, you're going to need to add a bit more powdered sugar as well. I can't tell you how much - you just have to watch the consistency and add until it's right.

We ended up with the following combinations

  • Chocolate hazelnut
  • Chocolate orange
  • Vanilla cherry
  • Vanilla coffee whiskey
  • Rose rose
  • Rose chocolate
  • Rose cherry
  • Lemon passionfruit
  • Coconut macadamia
  • Coconut chocolate 


We ended up with a total of about 150 macarons. Which, I'll admit, is a lot. 


The universally esteemed winning combinations were:

  • Lemon passionfruit
  • Rose cherry
  • Coconut macadamia
  • Chocolate hazelnut 


You can eat them right away, but they're better if you give them a little time for the filling to meld with the cookie. Store them in the fridge to keep your buttercream firm (but remember to let them warm up before you eat them), or, if you'll be storing them for more than a few days, freeze them.

The sky is really the limit on colorings and flavorings. The cookbook my friend gave me has all sorts of options - savory varieties using ingredients like beets, carrots,  and herbs, various sorts of sweet and savory tea-infused varieties, ganache fillings, jam fillings, caramel fillings, cream cheese fillings, berry fillings, lemon curd...really, once you have the basic technique down, you're only limited by what flavor combinations you find appealing. We all realized we'd missed an opportunity for chocolate mint (either chocolate cookies with mint filling or vice versa). Next time.

What about the cookies that inspired this whole thing in the first place? Did I even make amaretti?

I did, right at the end. As I mentioned, they are dead simple to make (adapted from the recipe at Love & Olive Oil):

Combine 2 1/4 c. almond flour, 1 c. granulated sugar and 1/2 tsp salt in a bowl

Whip the whites from two ROOM TEMPERATURE eggs until they start to foam, then add a pinch of salt, 1/4 tsp. cream of tartar, and 1/2 tsp. almond extract and continue whipping the mixture to soft peak stage (4-5 minutes)

Mix the whipped egg whites into the dry ingredients with a rubber spatula. No need to be gentle - in fact, I ended up basically kneading the dough at the end.

Roll dough into 1 inch balls, roll the dough balls in powdered sugar, space about 1 inch apart on a silpat-lined cookie sheet, bake at 300 for 30-35 minutes. Makes about 2 1/2 dozen cookies.


These are really good cookies. Are they as good as Vaccaro's? No. The consistency is perfect, but I think the almond flavor needs to be stronger. The thing is, almond extract is pretty powerful stuff, so some initial caution is warranted.

All three recipes I found used 1/2 tsp. of almond extract, but one recipe used that for 3 1/2 c. almond flour, and the other used it for 1 c. almond flour, so I chose the midpoint of the three. And since we'd already made FIVE full batches of macaron batter and had to go back to the store TWICE for more powdered sugar, and I used the last of the almond flour for the one batch of amaretti I made, I wasn't about to put the rest of the crew through multiple rounds of amaretti as well. Also by this point, it was after 8 pm, we hadn't had dinner yet, and everyone was starting to get cranky.

Other options I've seen that I'll try in future test runs include:

1. Add the zest of one lemon to the dry ingredients (which I would think might enhance the almondyness of the almond extract)

2. Increase the almond extract to 1 tsp.

3. Keep the almond extract at 1/2 tsp. but also add 1/2 tsp. of Amaretto liqueur (this is probably where I'll start)

4. Use *bitter* almond extract (if you can find it)

Regardless, it looks like I'll be adding a new pantry staple: almond flour.


13 February 2018

Food Lab 42: Alkaline Noodles

It's been quiet on the blog, but that's because your intrepid Food Labbers have been quite busy.

Mad Kitchen Scientist has changed jobs.

Chef Spouse and I spent two weeks in Hawaii celebrating a milestone anniversary.

I've been on several business trips (including two outside the US - fancy!).

We shared a peaceful Friendsgiving together at which we had the same number of desserts as we had guests, and a unique desert tipple to pair with each. (Apparently, Mad Kitchen Scientist and I are trouble together at the liquor store AND the fish market.)

We prepared our usual themed New Year's Eve feast with Mad Kitchen Scientist and The Executive Committee for their annual party (this year: nouvelle Russian, to prepare us for our new overlords, comrade).

We put on the annual Super Bowl party, and this year, winning their FIRST Super Bowl ever and ending a 57 year conference championship drought, celebrated the victorious Philadelphia Eagles! But we did not have as good a day as Jason Kelce, who truly was living his best life.

The man is wearing an authentic Avalon String Band
Mummers costume WHILE RIDING A BIKE
We also had the opportunity to use our cooking skills to benefit some members of our local community here in DC, and Mad Kitchen Scientist and The Executive Committee visited and re-created Chinese banquet for International Dilettante and Dr. Fruit Bat.

But after all that cooking and eating and drinking and serving and celebrating and traveling fun, we decided it was time to get back to labbing this past weekend.

Several years ago, a tiny ramen joint opened in our neighborhood. Turns out, it's outstanding - some say, better than Momofuku (I would be one of those). Chef Spouse has been obsessed by ramen ever since.

Here's the thing: it's always a long wait for a table there (it is TINY, no joke), but they do carry out, and you can easily order kaedama (extra noddles) for your leftovers for lunch the next day.

But he wants to make his own anyway, because that's how we do. (Hey, if you're a regular reader, you already know that.)

Ramen has four basic components:

  1. Broth
  2. Tare
  3. Noodles
  4. Guts/goodies

Chef Spouse has made some progress on a rich pork stock to form the basis of the broth. And he's messed around with pork belly (and Mad Kitchen Scientist's homemade kimchi and nori and soft-boiled eggs and kale and homemade pickles) for the guts/goodies on top. But he hasn't really worked on the tare or the noodles yet.

Here's the thing, though: I can't remember the last time I had pasta from a box. Chef Spouse makes fresh pasta ALL THE TIME. In fact, he's so fast at making it now that he puts the water on before he starts and he has the noodles ready to go before the water boils.

But you start reading recipes that call for kan sui (lye water), sodium carbonate, or potassium carbonate, and you get scared off. LYE IS DANGEROUS STUFF, YO.

We resolved to overcome our fears and give it a go.

In theory, you can get kan sui at an Asian market, but we have several VERY well stocked examples nearby and struck out at all. Potassium carbonate is something you have to order online.

But sodium carbonate is another story. All that is is baking soda (sodium bicarbonate) that's been baked in a 200 degree oven for about an hour, which bakes off water and carbon dioxide. Voila! Sodium carbonate!

Interestingly, Chef Spouse had baked up a batch probably two years ago, and it's been sitting in the pantry patiently waiting ever since. We also had about two quarts of pork stock hanging in the freezer.

For our Lab test, we tried the following:

Test 1 - old sodium carbonate
2 3/4 c. all purpose flour
3/4 c. water
1 tsp. sodium carbonate
1 tsp. salt

Test 2- new sodium carbonate (baked fresh that day)
2 3/4 c. all purpose flour
3/4 c. water
1 tsp. sodium carbonate
1 tsp. salt

Test 3 - MORE sodium carbonate (new stuff)
2 3/4 c. all purpose flour
3/4 c. water
1 1/2 tsp. sodium carbonate
1 tsp. salt

Test 4 - commercial ramen

Yep, this stuff:


Noodles only! Not the "flavor" packet. Anyone else flashing back to college?

All the sites we checked warned that the dough is dry and hard going in the kneading, and they were right. Start it in your Kitchen Aid with the dough hook and let horsepower do the job as long as you can. We took dough out when the dough hook stopped making any progress on forming it into a whole, and then had to knead each by hand for another ~5 minutes, which doesn't sound long, but this is TOUGH dough. As one site we read noted, "If you're not sweating, it's not ready yet."

We then rested them for ~20 minutes each, wrapped in plastic wrap.


When the dough came out of the plastic wrap, it was significantly more supple.

We also tested making two thicknesses of noodles. In the first test, we rolled the dough to the "five" setting on the Kitchen Aid before cutting. For the second test, we rolled it only to the "three" setting.


In handling the dough, there wasn't much difference between the old and new sodium carbonate batches. The MORE sodium carbonate batch was different, though - much less smooth.


Then we cooked them all - including the Top Ramen - in batches in the pork stock. We didn't mess around with tare or guts because we were trying to assess the noodles qua noodles.

We all agreed that the fresh sodium carbonate noodles had the best texture. The MORE sodium carbonate noodles had a slight off flavor. The Top Ramen had the customary curly texture (how DO you do that with fresh noodles? we couldn't figure it out), and were lighter but less flavorful than fresh, and oddly sweet. Opinions differed on preferring thin to thick (I thought the thick seemed a little gelatinous, but not everyone agreed). All stood up well to the broth over time - they didn't get mushy at all.


To go with? Mad Kitchen Scientist had gone pig-crazy (in fairness, we started it by tasking him with picking up and smoking a pork shoulder for a fundraiser we're hosting this coming weekend), so we had Chinese red pork and roasted pork belly to nosh on the side.


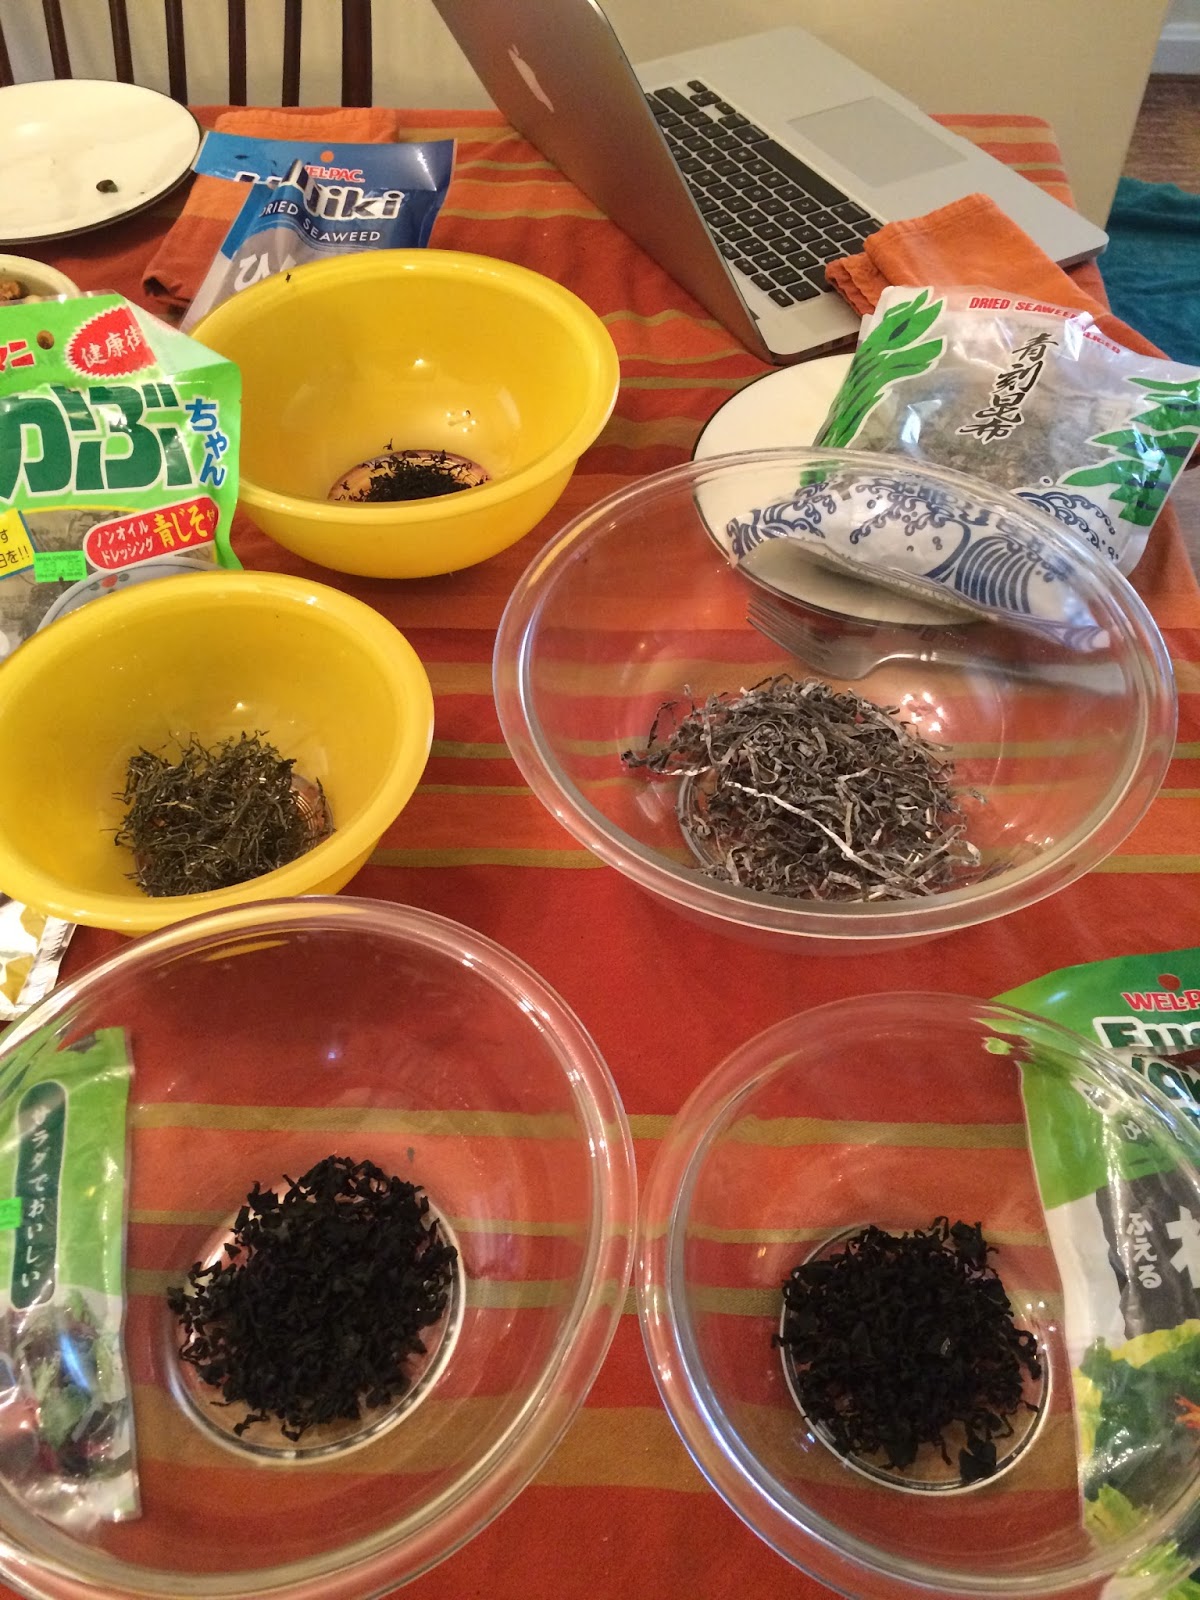
We experimented with making seaweed salad from scratch, too. Since the packages were mostly not labeled in English, we just picked up a variety. First step is to reconstitute the seaweed with hot water - and man, did the dining room smell like the ocean when we did - and then drain it and squeeze out as much water as possible.


Then you just create a basic dressing of Asian flavors - sesame oil, soy sauce, etc. (we also used rice vinegar, ponzu, honey, and some grated ginger), dress it, add sliced green onions and sesame seeds, done. We had picked up some prepared seaweed salad to compare it against. We hadn't lucked on grabbing the same type of seaweed you usually find in ready-made seaweed salad, and I do love the texture of that type, so that was a bummer. But the flavor of the homemade, by comparison, was much better. Once we had it to compare, we realized that the stuff you normally get at sushi joints is REALLY REALLY sweet.


Commercial on the left - homemade on the right
All the delicious nibblies (including some tiny pickled octopus
we picked up and a quick spicy Napa slaw with sriracha pickled radishes)
What did we drink? Chef Spouse started us out with a rum-based cocktail with ponzu and pimento bitters, garnished with lychee. Mad Kitchen Scientist had taken some of the absurdity of dried hibiscus flowers we were left with from making homemade bitters (which I never wrote about, because there really isn't much to say - you buy a bunch of odd ingredients from places like Mountain Rose Herbs, put really small quantities of them in Everclear, and wait) and turned them into a hibiscus liquor (rum based, with some "warm" spices and a little honey), and Chef Spouse was messing around with rum and rye and bitters and citrus, and what we eventually realized is: just put the hibiscus liquor in a glass with some silver tequila. Simplicity on the other side of complexity, my friends.

What we learned is that it takes a little longer to make fresh alkaline noodles than fresh pasta - but not much. They taste a lot better than Top Ramen. And you can do it with ingredients you already have in your kitchen, so don't be afraid of the mad chemist-sounding names.

(But Chef Spouse ordered some potassium carbonate and kan sui from Amazon anyway.)